KA-BAR BK2 Survival Knife

Got my first real survival knife! The KA-BAR BK2 is a solid knife with an incredible edge!

Bushcraft just got a lot easier.

KA-BAR BK2

Website Specs

Weight 1.0 lb.
Steel 1095 Cro-Van
Blade Type Fixed Blade
Measurements Blade length 5-1/4″; Overall length 10-1/2″
Grind Flat
Edge Angles 20 Degrees
Handle Material Grivory
Shape Drop Point
HRC 56-58
Stamp KA-BAR Becker
Pocket Clip N
Made in USA
NSN 1095-01-493-1798 KNIFE-COMBAT
Blade Thickness 0.250
Posted in Outdoors | Comments Off on KA-BAR BK2 Survival Knife

Warning about Extreme Powersports in Fredericksburg, VA

I have delayed posting for over a week to make sure my perspective is clear… I ordered and had new tires installed on my bike at Extreme Powersports in Fredericksburg, VA. Be careful with service!
BOTTOM LINE: Turns out, the mechanic simply put the front wheel back on WRONG! I can’t believe the shop 1. even did this and 2. let a bike leave the shop in this condition and 3. refused to consider repairs!!

Here’s the story if you’re interested in the play-by-play.

I simply took bike in for new rubber, front and rear. Little higher price than Coleman Powersports but wanted to support a smaller, local company. I am pretty knowledgeable working on cars but never really did maintenance on motorcycles so I wanted to have a shop do the job right. This is my first bike in 15 years and I was excited to get back riding.

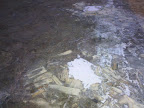
New tires were installed in one day which was nice. I was called and told the job was done but they had found one bolt partially stripped to which I asked if it should be replaced. I was excited to get back riding but not at the expense of safety. I was told no, that it was “fine for now”. When I picked the bike up, the front brake felt tight but figured everything was tightened up from re-attaching. Passed state inspection on the way home and parked for a few days due to rain and personal things. When I finally rode to work and was parking, I heard scraping up front and saw grooves in one of the brake rotors. Upon inspection I saw the outside of the right caliper body was pressed directly against the rotor carving it out. I called Extreme describing the problem then took the bike in on lunch break to show them the situation. Here’s when the disappointing stuff starts.

I was told the bike was just “old” and these things wear out and it was definitely because of the stripped bolt and also the calipers should be rebuilt too and it would all be done in a couple days. They even started to create a work order while I was talking to them. Well, it didn’t mesh, I knew it didn’t go in like that (I rode in the neighborhood for weeks prior) and after spending over $400 on 2 new tires and installation by them, I was not about to just leave the bike in their hands without finding out exactly what was going on. I do not think they intentionally did this to get me back in, just inept work and a disconnect between the shop and the sales counter.

My neighbor had recently taken apart 2 bikes to upgrade his current ride from the parts, so he is very familiar with bikes. He came over to look at my bike when I got home. He immediately saw the grooved rotor damage, caliper pressing against the rotor, a washer was missing, some of the axle appeared newly exposed and the right fork obviously out of alignment. I drove my truck back to Extreme and explained what had been found. I was informed THEY had a “certified mechanic” telling me what was wrong and my neighbor wasn’t. I was told that the problem/damage was because of the stripped bolt which they were “trying to save me a couple bucks” by not replacing it, and from worn out calipers and the bike is just old and needed more work. Compromising safety isn’t worth saving a couple bucks which is why I asked about replacement when it came up but was told it wasn’t needed at the time! Turns out, the bolt had nothing to do with the problem and the calipers are fine. They just kept giving me excuse after excuse. Finally I asked straight out if they were interested in fixing the damage. I got an “absolutely not” and the last thing I saw was their back as they abruptly walked away. Conversation was apparently over….

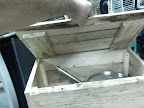
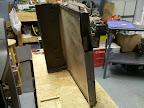
I don’t know how bikes go together and I wasn’t going to tackle something this critical on a whim. Well, the next day I was cleaning the garage and the neighbor came by and offered to take a closer look at the front end. He examined everything already mentioned and said it should be taken apart to see the whole picture and accurately tell if a fix was possible. Nothing going on so I said sure and he started talking ME through removal of the front wheel to inspect the components, patiently explaining how things worked along the way! 30 minutes later, everything is back together the RIGHT way and I’m back on the road and now know how the front end of a motorcycle works, yay!

I will just summarize the findings:

  1. Angled fork jumped almost exactly in to place once the compression thingy at the bottom was loosened.
  2. Nut on left holding on axle was spinning loose after cotter pin was removed (I was told this was a serious problem)
  3. Turns out, the bolt isn’t stripped at all, the caliper housing is!! (I figured this out on my own…without a motorcycle certification…)
  4. Re-installed wheel, tightened axle bolt hard, re-inserted cotter pin, tightened compression thingy after confirming caliper alignment. ALL IS WELL!!
  5. Caliper bolt will hold only without lock washer apparently removed at shop. Talking with neighbor about either “tapping” this or putting some kind of “threaded sleeve” in but I will be paying him to do that job!

Well, the wheel and fork are back on straight, caliper is correctly aligned, components are properly tightened and, thankfully, rotor is slowly smoothing over. I am once again enjoying being on 2 wheels! I can smile at the safe, simple outcome of this potentially deadly problem if the caliper had locked on the rotor or something!! That’s my story and I’m sticking to it.

Posted in Uncategorized | Tagged , , , , , , | Comments Off on Warning about Extreme Powersports in Fredericksburg, VA

Bushcraft practice – First time out

For the past month or so, I have been absorbing every piece of information I can find about bushcraft and primitive living. This is not a complete lifestyle change, just a way to live more simply and learn new skills.

Last weekend I took my first camping trip out to practice a few of the skills I’ve learned. It was below freezing at night so I also had a chance to test the new 0 degree sleeping bag. Would not have made it through the night without it but think I still need some underarmor or something to keep a little warmer in it. Also go to use the with the truck tent!

Here’s all the photos with descriptions
Picasaweb photos
-and-
Flickr Photos

Here’s the skills:

  • Firewood: found a tree nearby with a V and used that to snap wood I had scouted down to size for the long fire.
  • From 2012-01-28 Bushcraft practice
  • First thing I did was get a fire started to build up and get a coal base started while I set up camp. I had only learned about a long fire the week before and this was perfect for what I wanted to so. I did bring some pine from home so I wasn’t spending the entire time scouting for more firewood.
    1. I put down the sides parallel with the wind and gathered tinder, kindling and some wood.
    2. I made 2 piles of kindling each, small twigs and larger pieces.
    3. Yes, I cheated this one last time with a cotton ball but made char cloth later so hopefully I won’t ever need to do that again. 🙂
    4. Put cotton ball under tinder and put twigs on top of that. Used ferrocerium rod to spark the cotton ball and it lit right up. Continued to feed the fire fuel while I set up truck tent and tarp shelter.
    From 2012-01-28 Bushcraft practice
  • Char cloth is used to spark an ember and light tinder to start fires. I have been cheating with cotton balls and dryer lint but now I’m ready to make my own!
    1. Bought a tin with candle from the dollar store. Froze and chipped out candle and I had an oversized char cloth container as opposed to the $5 BB tins I’ve read about people using.
    2. Punched a small hole in the center of the top of the lid.
    3. Filled the tin with jeans cut in to 2×2 strips and secured the lid but you can use anything 100% cotton.
    4. Used some wood I snapped in the V tree that ended up almost being tongs to place the tin directly on the coals.
    5. The concept is when the contents of the tin are super heated, there isn’t enough air inside for them to flame up and gas escapes through the hole in the lid. This leaves the material charred but not burnt. Same way charcoal is made I think.
    6. So smoke started coming out of the hole withing about 10-20 seconds and continued for what seemed like 10-15 minutes!
    7. When the smoke stopped, I used the “tongs” to set the tin aside to cool.
    8. When I opened the tin…success!! I have char cloth that took a spark perfectly!
    From 2012-01-28 Bushcraft practice
    From 2012-01-28 Bushcraft practice
  • My first tarp shelter worked for all intents and purposes but I need much more practice securing the lines.
    1. I tied up a simple shelter to block wind and sun from a table on the site.
    2. Used two close trees and tautline knots to secure the top.
    3. Couldn’t find correctly placed trees on the back side so I used a couple stakes I had along and the same tautline knot.
    4. A little adjustment and the tarp was straight.
    From 2012-01-28 Bushcraft practice
  • Boiled water on fire with a pot I bought as part of a collection from an antique vendor in town for $10. Collection included 2 canteens, 3 nesting pots with lids, a couple pots and, the reason I bought it, a connecting fork/knife for the mess kit.
    1. Found a stick with a bend that I stripped the bark off of and carved a groove in the nook to catch pot handle.
    2. Took longer than I thought but the water finally boiled.
    3. Used the hook stick to remove from fire and used another stick to tilt the pot and pour water in my steel cup.
    4. Mix in some hot chocolate and relax by the fire for a bit!
    From 2012-01-28 Bushcraft practice
    From 2012-01-28 Bushcraft practice
  • Made smores later but I don’t think they are an official bushcraft item. 🙂
  • Hobo meal for dinner
    1. Pre-cut and mixed potatoes, onion, garlic, and red pepper at home.
    2. Take out 2 sheets of tin foil and make a “bowl” to put food in.
    3. Cut up keilbasa and put everything in tin foil. Add salt and pepper.
    4. Pull over tin foil and fold over top on itself a couple times to seal.
    5. Fold up ends and press firmly to seal.
    6. Used “tongs” from before to place tin foil on coals
    7. Total of 10 or so minutes flipping half way through.
    8. Perfectly cooked and sssooo tasty!
    From 2012-01-28 Bushcraft practice
    From 2012-01-28 Bushcraft practice
    From 2012-01-28 Bushcraft practice

This trip was short, local and really fun but I plan on taking longer time out when it gets warmer. Going to reorganize my stuff and plan a trip up to Shenandoah for a real boondocking trip I’ve been looking in to. I found it was actually very easy to go minimal while camping and I didn’t miss or use any of the usual items such as propane for lighting and cooking and camp stove even though I brought them just in case.

My sources of learning bushcraft and primitive living were almost exclusively youtube videos but special thanks go to Dave Canterbury with Wilderness Outfitters and Adam from Equip2Endure for their awesome tutorials and the detailed information they post!

Posted in Outdoors | Tagged , , , , , , , | Comments Off on Bushcraft practice – First time out

Crate project

Finally found an idea to reuse all the pallet wood! A crate to carry camping stuff in…

Measured a stack of pots and pans the wife gave me and came up with L20xW12xH10.

Had some regular slats and a few larger ones I decided to use for the sides. Also had some 1×2 for leftover reinforcement from the Camper Project.

Actually cut all the pieces to length a couple days before assembly which was fun because I had to think about which pieces would overlap where, and account for the thickness of the other wood in the dimensions.

From 2011-12-05 Crate Project

As it happens, I actually figured it out correctly and assembly was a matter of minutes.

From 2011-12-05 Crate Project

Drilled pilot holes, counter sunk and used 1-5/8 wood screws.

From 2011-12-05 Crate Project

Here we go!! Pots and pans fit perfect and ready for camping!

From 2011-12-05 Crate Project

Thinking it needs a lid so it can double as a seat out there!

UPDATE (2011-12-07)
Made the lid. Nice, tight fit.

From 2011-12-05 Crate Project

Left 1/8 overhang on ends and 7/8 on sides to use as lip to open with

From 2011-12-05 Crate Project

And works as a seat

From 2011-12-05 Crate Project

And works as a stool

From 2011-12-05 Crate Project

That’s it!
Functional and stylish!
Gonna leave it at that.

Posted in Outdoors, Woodworking | Tagged , , , , | Comments Off on Crate project

Vegetable Garden – Final

The peppers did eventually come in! Thought I got red but I guess not… 🙂

First noticed them on September 15

From 2011 garden project

Coming along nicely October 6

From 2011 garden project

Picked and used in egg omelette October 6…yummo!!!

From 2011 garden project

Wrap up
This vegetable garden project was a lot of fun!! I will definitely do this again next year. Planning on moving to a spot that gets more sun and making it much larger with many more plants!

Posted in Gardening | Tagged , | Comments Off on Vegetable Garden – Final

Veggie Garden results

So far I’ve picked a cucumber and lots of tomatoes!

Carrots didn’t make it and I think peppers will start coming out soon.

Lots of tomatoes!!

From 2011 garden project

uummm, one cucumber??

From 2011 garden project

Well they were really tasty! Much better fresh from garden than store bought!

From 2011 garden project
Posted in Gardening | Tagged , | Comments Off on Veggie Garden results

1982 Coleman popup project coming along

The camper rebuild is coming along slowly but surely. My dad came over last weekend and “saved me from myself” thinking I could handle the inside rebuild, ha! Anyway he knocked out in 1 day what would have taken me 4 to do!!

I created a thread on popupportal.com that goes into more detail and has other users’ invaluable input!

Here’s a quick list of fixes done so far:

Easy Door seal fix, had some in garage so I just cleaned up old goo and applied new seal.

From Coleman Popup Camper Project

Screen repair kit for < $5 took care of the holes.

From Coleman Popup Camper Project

Complete inside tear down.

From Coleman Popup Camper Project

Secured outside aluminum body.

From Coleman Popup Camper Project

Cut insulation to fit around interior.

From Coleman Popup Camper Project

Learned how quick Bondo sets up while repairing some holes in the floor!

From Coleman Popup Camper Project

Did my first Linoleum job!

From Coleman Popup Camper Project

Learned that patches look better than silicone squeezed outta tubes…

From Coleman Popup Camper Project

Chipped off and caulked the entire roof!

From Coleman Popup Camper Project

Second Bondo experience ended up looking like this, temporary spray paint until full paint job happens.

From Coleman Popup Camper Project

Got all the pin stripe stickies off, first with power washer then scraping with blade.

From Coleman Popup Camper Project

In process of fixing the tore up step door

From Coleman Popup Camper Project

Almost ready for upcoming campout trip! More to come soon. Just need to do a few more things then upload photos.

Posted in Outdoors | Tagged , , , , | Comments Off on 1982 Coleman popup project coming along

Home Garden Thriving!

I have been watering and weeding daily and the vegetables are really coming along! No strawberries after putting down netting but I was told the season is over and they will put out runners now but no fruit, so sad I missed them. :< Here's a picture from June 12, 2011.

From 2011 garden project

The cucumber is flowering and really taking over a lot of space, the carrots and red pepper are getting tall and the tomato is flowering AND has one started!

From 2011 garden project
Posted in Gardening | Tagged , | Comments Off on Home Garden Thriving!

1982 Coleman Redwood popup camper

Bought a fixer-upper camper project! A 1982 Coleman popup for $300. Canvas is in decent shape which my the most important requirement. Lower door/step was run into a tree so it’s bent/broken and needs replaced.

From Coleman Popup Camper Project

The electrical hookup outside is missing so I need to look in to that. The gas lines are there but I don’t feel comfortable using them. Will probably ultimately mount a propane tank or two on the front and run a line to a setup outside the camper. Awning is there but I haven’t taken it out to evaluate, zipper is broken so it’s held closed with alligator clips.

From Coleman Popup Camper Project

Well, first thing was to clean out the previous owners stuff and scrub from top-to-bottom. I cleaned out half a truck bed worth of trash and food swept out of all the cubbys.

From Coleman Popup Camper Project

My wife graciously scrubbed the canvas inside with soap and water and got the floor 3 shades cleaner! It was an incredible transformation!! The cross-braces under the bench seats were broken so I fixed them by drilling out the rivet-looking things and I had some short straight-head bolts/nuts used in place of rivets. Also put a couple extra screws in the cabinet where heater would be for structural support.

From Coleman Popup Camper Project

Outside, the panelling is pulling away from the body so thinking L brackets for fixing that. The old heat vent has a dryer vent over it so I’ll probably just get a metal plate to cover until, if ever, I get an actual heater. Lift posts were sticking but went smooth after I hit em with some white lithium grease in the joints. Tongue is bent slightly but solid. It actually tracks a little to the driver’s side so turns out I can keep an eye on it with a quick glance while towing. The jack wheel is fine far as I can tell, goes up and down anyway.

There is actually a ton of room compared to being in a tent so just cleaned out, I’m getting excited about hitting the camp sites! All in all, it was well worth the $300 after cleaning it up!! Bought it on Sunday, cleaned over a couple evenings during the week, wife worked on the inside most of Friday while I registered and tagged it and took it camping on Saturday! Good times!!

From Campout May 28, 2011

Stay tuned for upcoming fixes and tweaks…

UPDATE: Also made a tool kit to keep in the camper. Had a socket that fit wheel lugs and another for spare tire bolts, breaker bar, pump jack I had around and a couple screwdrivers. Used the jack to level the camper so that was handy. Found a decent size carpet scrap for $2 at Family Dollar for entry mat.

Posted in Outdoors | Tagged , , , , | 4 Comments

Acer Iconia A500 tablet, I gots one!

The wait is over!! It has been almost a year looking for the “right” Android tablet. First choice was the Asus Transformer, keyboard and extra battery sounded like a cool accessory for a tablet. Unfortunately it sold out in minutes!

Well, tablets are really powerful and full of features nowadays so I started checking for one with specs equivalent to the Transformer and whadya know, there’s one with a little better reviews!

I have had the Acer Iconia A500 for a day now and it`s everything I was looking for. The 10 inch form factor turned out to not be too big like i thought it would. The Android Honeycomb OS is smooth and has good reaction time.

Acer Iconia A500

I thought the GPS was fried since I was only getting good info when wifi was connected. Turns out some people are actually getting bad hardware but mine was fine. Downloaded GPS Test and went outside. Found plenty of satellites and Navigation eventually kicked in. Read that the more it is used the faster it will get so we will see.

All in all, I’m totally glad I waited and love this device.

Posted in Tech | Tagged , , , | Comments Off on Acer Iconia A500 tablet, I gots one!