Harbor Freight 45 Watt Solar Panel Kit and battery

My dream is to take the camper to a quiet, secluded lake-side site to relax and enjoy the outdoors. A critical step towards that end is….power! Got the standard starter kit, a 45W harbor freight 3-panel kit that includes a controller. Also purchased a deep cycle marine battery from Costco and battery case from Walmart to get started. I’m not mounting these on the roof because I want the option of parking the camper in the shade and running the panels out to the sun to power up.

You can view the whole photo album or keep reading below for details.

The day of assembly was after work and overcast so couldn’t fully test but I got the solar panel kit put together. Frame pieces were straight forward and panels aligned and bolted on with no problems.

Kit includes a controller and everything to hook up, light up or USB power most anything 12V!

I re-used the styrofoam in the package to protect the panels when not in use. I cut some scrap plywood to length and stretched some bungee cords around to hold it all in place. Also made sure the bottom bungee was high enough to hold the legs from flopping around. Add some velcro wire ties and all is secured for storage.

I still need to hook up the battery but it has been hot and I read extreme temperatures either hot or cold is bad for them to be out in. I am on shore power at home so no rush and it’s just a matter of hooking up terminals and strapping down box to the existing spot on the tongue. All setup and ready for some boondockin!!

I’ll make another post of the whole system installed and in action. Hopefully I will have some time soon to get out and use it!

Posted in Outdoors | Tagged , , , , | Comments Off on Harbor Freight 45 Watt Solar Panel Kit and battery

1987 Fleetwood Prowler 24P Hardwood Flooring

This one is too fancy for this camper! My dad had leftover hardwood flooring taking up space in his garage from various jobs and offered it for the camper. After measuring, there turned out to be just enough to do the whole camper with some creative sectioning of the dinette area. There is white maple throughout, dark oak under dinette area and light oak in the back bunk section. I held and cut things a lot while my dad did all of the calculating and installation but I watched closely so I gained more knowledge that day!

You can view the whole process by starting here in the photo album or keep reading below for the details.

I was really surprised the floor came glossy and finished. Thought I was going to have to seal it after installation but is was a plug-and-play operation. Immediately inside the door matched up perfectly even with the door frame and I can’t say enough how fancy this stuff looks in there! The main section transitioned perfectly into the rear light oak.

There was not enough white maple to span the entire camper so my dad sectioned off the dinette section with a different color. It turned out great! I cut off the dinette bench and turned the table long ways instead of sideways so there is a LOT more room to move around now too!

All the hardwood was installed in one day, trim and all!

The man and his handy work! Thanks dad, ya made the camper too fancy for itself! 🙂 Lunch on the camp grill FTW that day!

The trim has covered where the old cabinet door hinges were mounted so I’ll have to find some inside mounted ones to put back on. I want more updated cabinet hardware anyway so let the searching begin.

Posted in Outdoors | Tagged , , , , , | Comments Off on 1987 Fleetwood Prowler 24P Hardwood Flooring

1987 Fleetwood Prowler 24P toilet, ceiling, roof and couch finally!

I’ve been working as time allows and have a bunch of updates to show in this post. Also recently successfully tested water system and changed the bad tire out.

Reserved a spot this weekend so had to scramble to make a temporary couch frame. While I’m out I’ll flush the tanks a few times, test the hot water heater and try the AC!

Removed the toilet because the bowl seal wasn’t holding antifreeze for long when I winterized. I put on my hazmat suit and cleaned the toilet from as far away as possible! Moving forward I will seriously consider a composting toilet instead of a black water tank…YUCK! I purchased both the bowl seal and base seal and they are functioning with no problems now. The toilet had faded to that old yellow and had some weird paint stains on the top of the lid so I hit it with about 7-10 layers of Krylon plastic paint and it is a nice new white now.

All the insulation from being reused, rescued from trash at work, my neighbor and my Aunt was free, has been installed and fills all the voids in the ceiling! Time to put up the paneling then later will paint put up trim.

Next was the biggest project so far. Most all the seams, seals, protrusions and holes in roof need fixing. I used dicor self leveling caulk in some places then found Eternabond tape which adheres to most everything and lasts just about forever from what I’ve read. Not the prettiest thing but it has done the job nicely so far.

Started with the front seam where all the leaks I’ve found started then I taped over the dicor for added protection around the vent.

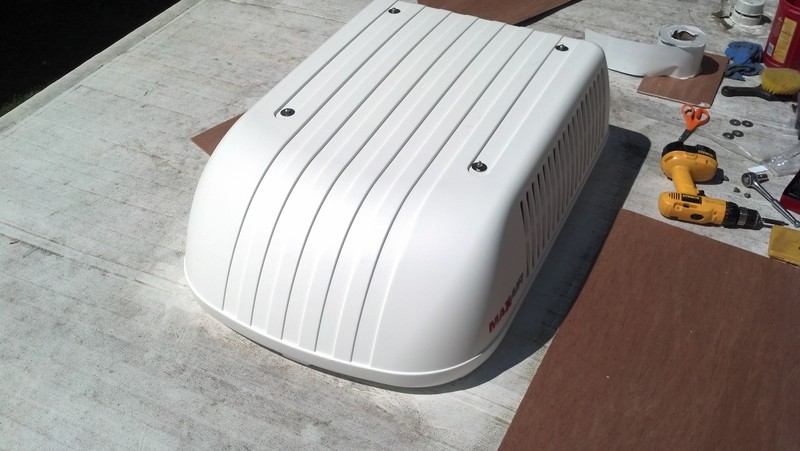
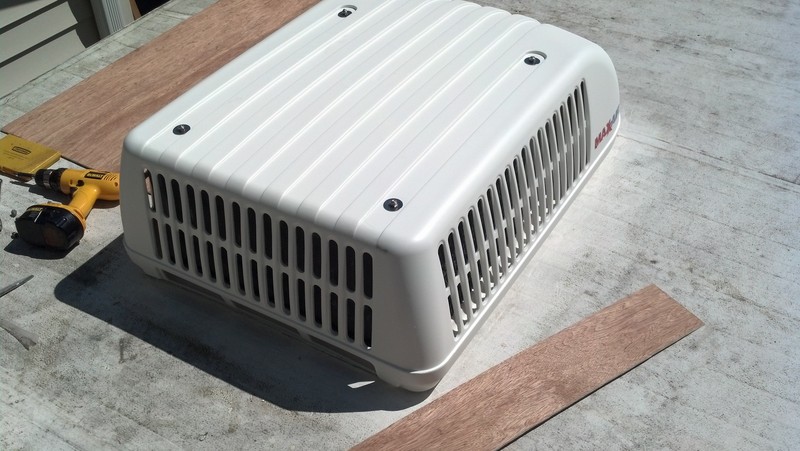
I fixed up the AC and surrounding area. **UPDATE – DO NOT DO THIS!! I learned there is an inner seal to keep water out, taping this way holds condensation in and floods inside…yup, learned a hard lesson.

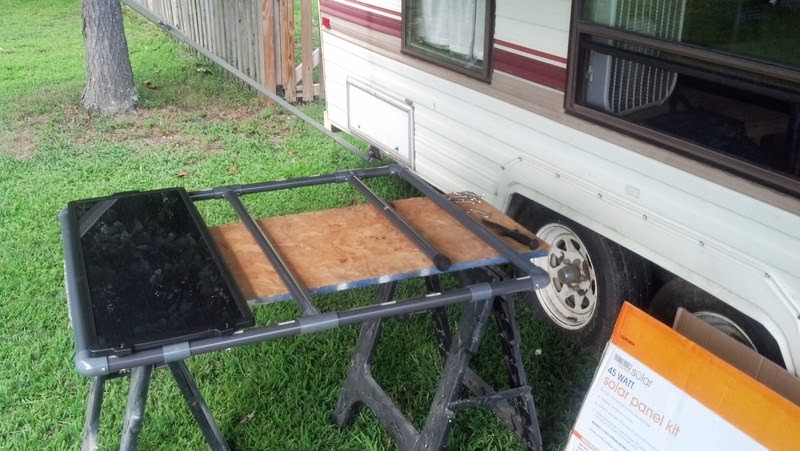
When I removed the AC shroud it crumbled in my hands! The sun had deteriorated the material so bad it just fell apart. So quick call and trip to Graninger and I had an aftermarket shroud installed right in place of the old one.

I also found a vent that was all jacked up so I removed everything and put back with putty and Eternabond tape. Messy job as it was the first time I tried to tape around a round object but keeps the rain out.

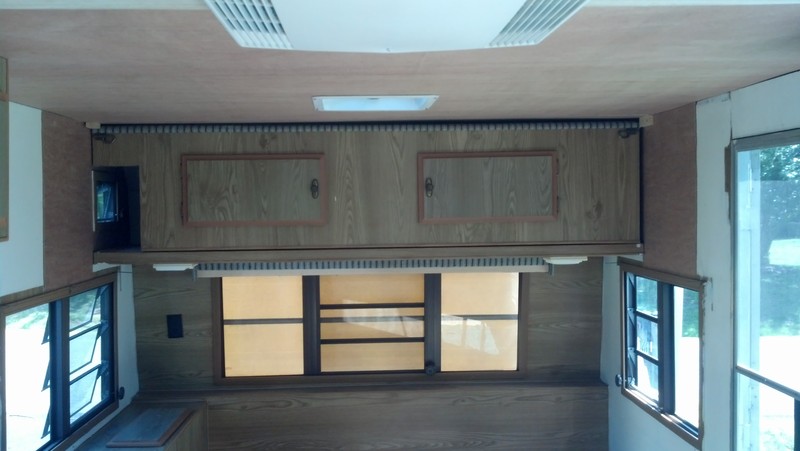
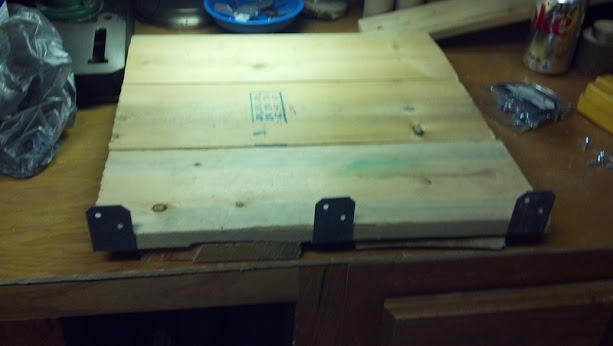
Decided to temporarily put up the bunk top for extra storage. Probably just going to remove later and make a nice shelf face but it was there and the hole the PO cut is perfect for opening the upper window! The piano hinge was rusted solid in place and luckily it was at an “L” angle so I just screwed it in flush with shelf end and added a couple blocks for upper support.

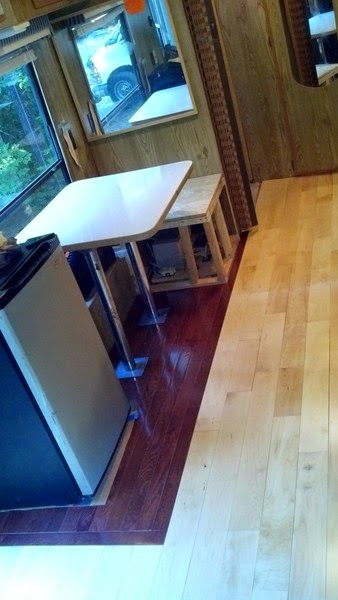
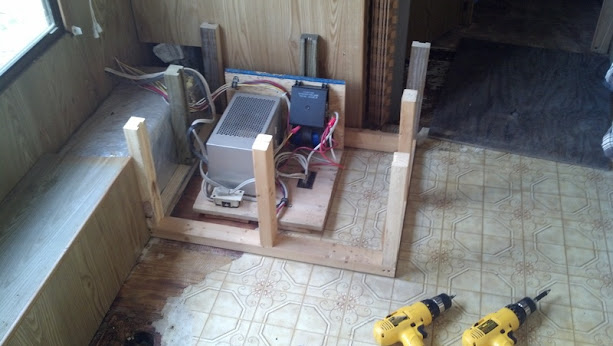
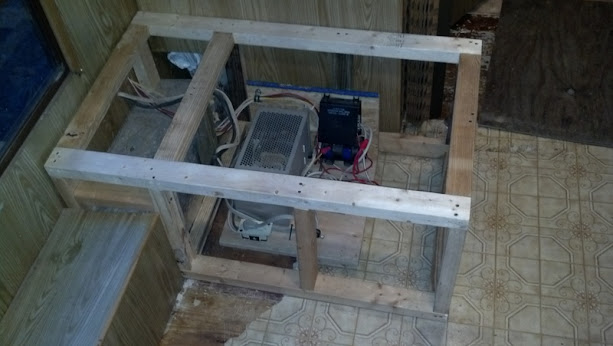
Last night after work I threw together a quick couch frame for this weekend. I’m getting the hang of this framing thing thanks to my dad patiently repeating how to do it and I only had to call him with ONE question this time! 😀 The futon mattress is kinda huge but it fits and plenty of space to sit or sleep since it’ll just be me. The studs were spaced just right so I could tuck all the towing apparatus beside the fresh water tank while not in use and I can still take paneling off the seat and get to the fresh water tank, water pump and hot water heater with no problem.

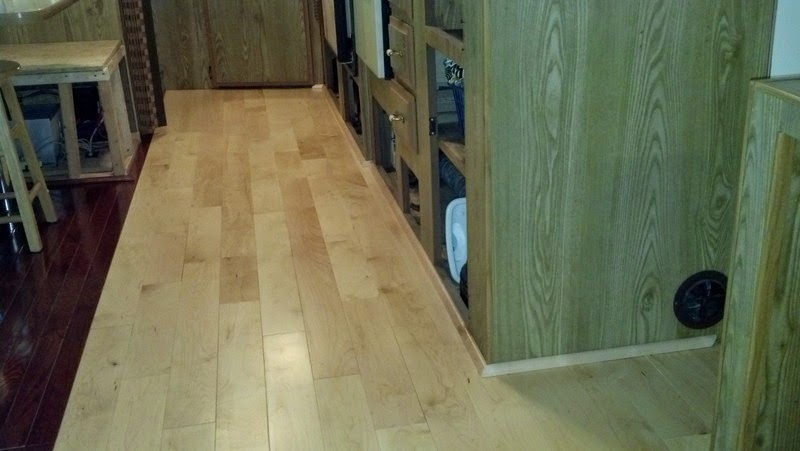
The camper is getting cozy! The leaks are all fixed and the rebuild is coming along, albeit slowly as time allows. My dad gave me leftover 3/4″ maple hardwood and some other extra for the floor so that’s the next big project as soon as he has time to come down and teach me how to install that stuff.

Really looking forward to relaxing this weekend and testing the other systems out!!

Posted in Outdoors | Tagged , , , , , , , , , | Comments Off on 1987 Fleetwood Prowler 24P toilet, ceiling, roof and couch finally!

Camping at Elizabeth Furnace Recreation Area in Strasburg, VA

Decided to take a break from working on the camper last weekend and get out and enjoy the outdoors. I started skimming at the usual freecampsites.net and found some WMA land up near my bro in Front Royal but unfortunately, no camping but hiking will be a post in the near future! I eventually discovered freecampsites.net Elizabeth Furnace entry.

You can view the whole photo album or read below for details.

It is in George Washington National Forest and owned and maintained by the Forest Service. It is a first-come-first-served area and is in the last month of off-season so nightly fee is $10 versus a low $14 on-season! There are many hiking trails and a good size creek running by the sites.

Turns out it was a yearly trout re-stocking weekend in the creek so the place was packed with fisherman but it did not feel crowded!! I ended up on site 19 and it was at least the distance of 3 regular campsites from the nearest neighbor so it felt very spacious, quiet and relaxing. The bathhouses were still closed but gravity toilets were available and clean.

I setup the truck tent and my dad let me use his old backpacking backpack and Coleman camp stove so I bought backpacking meals to try. There was a nice fire ring surrounded with stone lightly concreted in place. Also had an adjustable grate so I used that for keeping water warm and a little cooking coming up in a bit. My usual sleeping setup was comfortable and it dropped to about 40 overnight only going below a little for a couple around around 6:00am.

Tried my first Mountain House meals but did not enjoy them and they did not agree with me! Chicken Teryaki actually tasted decent but the rest were nasty and none of them ended well! So it’s back to bushcraft food like baked potato on coals and hobo meals.

Made my first batch of bannock! Mixing is messy but the result was awesome. I used the Bushcraft Bartons method of skinning the bark off a stick and wrapping it around to cook over the flames. Ended up making too much so I also made a patty of it.

The next day was all hiking. Walking along the river was peaceful but not very long trails.

Then I followed historical landmarks. Started with a amphitheater, then the old house and extension bridge.

Hiking the Pig Iron trail took me about half way up the mountain. I saw the original furnace and where they mined ore from.

Last thing I did was figure out how to re-string my fishing rod. Since found out I used to heavy a line so will be re-doing that again real soon but at least now I know how. Also had a compact container I’ll use to carry fishing gear instead of a big ole box.

I will definitely go back again!! It is a beautiful place with miles and miles of hiking trails around. The camping sites are secluded and quiet and the river is only a short walk away.

Posted in Outdoors | Tagged , , , , , | Comments Off on Camping at Elizabeth Furnace Recreation Area in Strasburg, VA

1987 Fleetwood Prowler 24P Electrical platform and dinette bench rebuild

A while ago I disassembled the homemade, rickety bench on the back side of the dinette. This left nowhere to sit and the electrical mess exposed. The rebuild resulted in a solid bench and organized, secure electrical mount.

As always, you can follow the photo album from here then read below for the details.

All the electrical is just laying loose or boxes screwed to the floor or back wall.

I re-used pallet wood and old hardware from the camper to build a platform to mount everything on.

Next I built the dinette bench. Made a LOT of calls to my dad on how to frame it out and I’m learning a lot! To size it, I referenced pics online, the manual I got with the camper and finally the fading on the wall and floors. Turned out to be 39″x24″ on the top and the base is 29″ wide and it is 17″ tall. This worked out really nice for sitting and with a ~1″-2″ seat cushion and 2″-3″ back cushion it should be very comfortable.

Posted in Outdoors | Tagged , , , , , , , | 2 Comments

1987 Fleetwood Prowler 24P ceiling and roof fix

The old ceiling rafters were rotted and new 2x2s were just screwed to them for support!?!? Also the vent and old antenna location were all leaking so I ripped it all out and my dad came down to help finish the rebuild on the ceiling.

As always, you can follow the photo album from here then read below for the details.

Just for something to do earlier I had taken a rough cut 2×3 my neighbor gave me and re-did the front run with rafter and cross supports. I have had a 2×2 supporting the vent so it was nice to get that out of the way. Old rafters were so rotten I just pulled and they ripped right out! Well, my dad came down to the rescue once again and knocked out the rest of the rafters faster then I could do one!

I had to buy some 2x3s and another size box of screws but everything else is scrap or extra materials around. Next I cut-to-fit FREE insulation I got leftover from one of my aunt’s projects, neighbor had a sheet he gave me and small pieces from work destined for trash!

Next job to tackle is one I’m not looking forward to. Basically all pieces on the roof need putty under them and caulk or tape over to completely seal them from water leaks. I started with the newly leaking old antenna site. Took it all out and patched the hole with a piece of extra sheet metal from neighbor. My mom reminded me I knew how to rivet so I used that to secure the patch. Next I took the vent out, cleaned, resealed and reattached securely to the new rafters.

Finished off all the seams, patch, vent and screws with Dicor self-leveling caulk so should be water tight and only require touch-up once a year.

Still need to re-do the edges and seam along front so I will probably order some 4″ x 50′ roll of eternabond tape for that job then it should be completely ready to take on the weather. Can’t wait to take that big blue tarp off!

Posted in Outdoors | Tagged , , , , , , , , , , | Comments Off on 1987 Fleetwood Prowler 24P ceiling and roof fix

Hiking at Virginia Merrimac Farm Wildlife Management Area (WMA)

In my search to find free places to boondock and just enjoy the outdoors I came across Wildlife Management Areas! The East coast doean’t even come close to the BLM lands out West so this is definitely a challenge.

WMAs are public lands geared more towards hiking, hunting and fishing but some allow primitive camping and that’s what I’m after. Today’s adventure was strictly a nature hike. There is no camping allowed but there are some beautiful, peaceful woods. As of January 1, 2012 there is a $4/day fee or free access with certain permits including a freshwater fishing license which I have.

My main resource right now for finding free places to go is http://freecampsites.net/. They list all kinds of places from state lands to private land to parking lots!

The website has a lot but not all of the details from the Department of Game and Inland Fisheries Merrimac Farm website. Additionally, users can star rate and comment on an area.

You can jump to the photo album then read on for a quick synopsis of the journey.

I started at the North parking lot where I hiked a short trail to a gravel/grass road down to a rather large pond with a hunter’s shack at the bottom end. The walk was nice but lots of farm land off to the side and not extremely secluded. I don’t think I followed the whole road and turned around after the pond.

Then I drove down to the Cedar Run entrance and walked to the Stone House and followed the trail to the left. The trail head had an olde timey refrigerator that just looked like a stone structure with water running through. Have to lookup exactly how this kept items cooler. The first jaunt was over platforms mostly covering the marshy areas. After crossing a platform about 10 feet across some water I turned left and was met with a creek on the left in a ravine and deep green grass around that looked almost like another world.

A little farther down I ran into the river and the trail is sorta near the bank. Sometimes I went off the trail to see the water and eventually ran into a bench overlooking the river. The trail winds through the woods with no sounds of traffic…so peaceful!! The trail loops back to the right and up through a marsh where Troop 1195 was rebuilding the walkways so I didn’t take any more pictures. After the platform walkways there are grass roads heading back out towards the Stone House. Along those roads is an old abandoned red barn!

Unfortunately, there is no primitive camping allowed without permission so this is a day hike only kinda place. The North trail looks big on hunting and fishing can be done on either trail I guess.

It took a couple hours to walk both trails and was an awesome, peaceful, relaxing place! I’d recommend the Cedar Run Stone House trail for an hour+ hike of relaxing nature sounds! Just make sure it’s been dry unless you want to slip-and-slide in some places!

*UPDATE 3/28/13

Found some more information on this location:

Prince William Conservation Alliance
The Occoquan River runs by the property

Posted in Outdoors | Tagged , , , , , , , | Comments Off on Hiking at Virginia Merrimac Farm Wildlife Management Area (WMA)

1987 Fleetwood Prowler 24P Furnace Fix and cover

One thing the PO was actually honest about was telling me the furnace didn’t work because they never used it. Project commence! Furnace was completely full of mud dauber nests, remains and spiders! At least there were no live ones to deal with, I hate bees!! Removed the unit and my handy neighbor who is completely comfortable with gas took it and completely disassembled, drilled out EVERY hole in the burner and cleaned out everything checking each component!

He figured out the gas valve was leaking so I bought a replacement online for about $40 for him to replace. It wasn’t an exact swap and didn’t fit so he essentially parted out the new valve into the old housing. On his recommendation I also bought a new combustion tube and kit he could replace pilot lines.

With a little after install tightening, the new furnace fired up with NO leaks!!

Before we put the furnace back in I resealed the intake/exhaust with putty and secured in place.

I actually bought a screen I had seen on youtube to cover the intake/exhause vent to keep critters out. Well, after discussion and thankfully before opening so I could return the screen, my neighbor made a cap from extra materials around his house to cover the intake/exhaust vent in the summer months so the mud dauber nests don’t reoccur. I drilled a hole in the vent tab to accept allthread hook and matching one in the cover and secured with a wing nut.

I am planning on towing the whole thing down to station8 firehouse and have them sniff the whole thing to make sure there are no leaks then buy a carbon monoxide detector for in the camper and I’ll be comfortable running the furnace in the colder months!

Posted in Outdoors | Tagged , , , , , , | Comments Off on 1987 Fleetwood Prowler 24P Furnace Fix and cover

Paracord zipper pulls for mom

My mom asked for more robust zipper pulls she could really grasp for her bags. She supplied the hooks and I did a 2.5 inch cobra weave and viola!

I also made a quick jig with screws to hook on to provide tension while weaving and measure marks.

Posted in Outdoors | Tagged , , , | Comments Off on Paracord zipper pulls for mom

1987 Fleetwood Prowler 24P Wheel Bearing Repacking

Did my first wheel bearing repacking and it just had to be a dual axle trailer… Turned out to be easy, just time consuming and repetitive. I didn’t know about the inside seals so didn’t replace this time but I will on the next.

They were really dry and shoes were dirty but they cleaned up nice and the drums were worn evenly.

Repacked outer bearings and pushed as much as I could into the inners. Everything went back together smoothly and spun freely.

Here’s another lesson on camper purchasing to look for! I found a ground down wear spot on the driver’s side front tire! Must have locked up at one point on the PO they didn’t tell me about and left on… I wondered if the other 3 could balance the load even though this one was out of round so I posted on irv2.com. Learned something more than an eminent blowout that I didn’t even think about. The “vibration” caused by the bad tire would shake the camper apart so I will not even be using this as a spare! I shopped around and found a used tire in good condition, thick tread and no dry rot for $35 that I’ll use in its place until next replacement.

Posted in Outdoors | Tagged , , , , , , , , | Comments Off on 1987 Fleetwood Prowler 24P Wheel Bearing Repacking